Django Custom Widget With 3 Examples
Intro
Hi folks, in this article we will create 3 custom widgets for django apps. The widget in the django term is a field html display in the form. For instance, CharField this default widget is TextInput that render <input type='text' ..../>. FileField the default widget is FileInput that render <input type='file' .../>.
We will create a toggle widget, 2 select that use select2 component, and the last is a file input using dropzone. We will walk step by step from the easy one to the hardest part. And at end tutorial, I hope you can create your own very awesome django widget.
This tutorial is for django 1.8 and 2.1 versions. And you can found the code at https://gitlab.com/ihfazhillah/django-custom-widget-code.git and look at django-lt-1.11 branch for > 1.8 version and django-gt-1.11 branch for the 2.1 version.
Initialization
Lets create two new django projects. First for 1.8 and second for 2.1. Use pipenv to make your live easier :D.
pipenv install Django==2.1
pipenv shell # go to virtualenv shell
django-admin startproject custom_widget
and
pipenv install Django==1.8
pipenv shell # go to virtualenv shell
django-admin startproject custom_widget
Then, go to each of custom_widget folder and run python manage.py runserver and make sure that two servers works.
PS: Don't forget to different the port.
Time to create a new view.
Open custom_widget/custom_widget/views.py and add these lines.
from django.shortcuts import render

def home(request):
    context = {}

    return render(
        request,
        'home.html',
        context
    )
In this view, we will handle all stuff. The form, and the values. You can see, that we use home.html as template. To make it work, we need to specify TEMPLATES['DIRS'] setting.
Open the settings.py file and make change a change.
TEMPLATES = [
    {
.....................................................................
        'DIRS': [
            os.path.join(BASE_DIR, 'templates')
        ],
.........................
save and then create templates folder at custom_widget folder (your root project folder) and create a new file called home.html. Nah, this file will called on the previous view definition.
<!DOCTYPE html>
<html lang="en">
<head>
    <meta charset="UTF-8">
    <title></title>
<link href= rel="stylesheet">
<link rel="stylesheet" href="https://maxcdn.bootstrapcdn.com/bootstrap/4.0.0/css/bootstrap.min.css" integrity="sha384-Gn5384xqQ1aoWXA+058RXPxPg6fy4IWvTNh0E263XmFcJlSAwiGgFAW/dAiS6JXm" crossorigin="anonymous">
<style>
.custom-select2-widget {
  width: 100%;
}
  .free-space {
    margin-top: 50px;
  }

  .toggle-handle {
    background: #fff;
  }
</style>
</head>
<body>

  <div class="container">
    <div class="free-space"></div>
    <h1>Custom Widget Tutorial</h1>


  <pre>{{ request.GET }}</pre>

  <hr>

    <form action="" method="get">

    <input type="submit" class='btn btn-block' value="Submit">
    </form>

  </div>

    <div class="free-space"></div>

<script src="https://code.jquery.com/jquery-3.3.1.min.js" integrity="sha256-FgpCb/KJQlLNfOu91ta32o/NMZxltwRo8QtmkMRdAu8=" crossorigin="anonymous"></script>
<script src="https://cdnjs.cloudflare.com/ajax/libs/popper.js/1.12.9/umd/popper.min.js" integrity="sha384-ApNbgh9B+Y1QKtv3Rn7W3mgPxhU9K/ScQsAP7hUibX39j7fakFPskvXusvfa0b4Q" crossorigin="anonymous"></script>
<script src="https://maxcdn.bootstrapcdn.com/bootstrap/4.0.0/js/bootstrap.min.js" integrity="sha384-JZR6Spejh4U02d8jOt6vLEHfe/JQGiRRSQQxSfFWpi1MquVdAyjUar5+76PVCmYl" crossorigin="anonymous"></script>
</body>
</html>
The code above is for home.html.
The view not called yet when we enter the http://localhost:port address. To make this happen, bind this function into custom_widget/custom_widget/urls.py
# Django 2.1
from django.contrib import admin
from django.urls import path
from .views import home

urlpatterns = [
    path('admin/', admin.site.urls),
    path('', home)
]
or
# Django 1.8
from django.conf.urls import include, url
from django.contrib import admin
from . import views

urlpatterns = [
    # Examples:
    # url(r'^$', 'custom_widget.views.home', name='home'),
    # url(r'^blog/', include('blog.urls')),

    url(r'^admin/', include(admin.site.urls)),
    url(r'^$', views.home),
]
Look, do you see the differences? Here the documentation urls (2.1, 1.8).
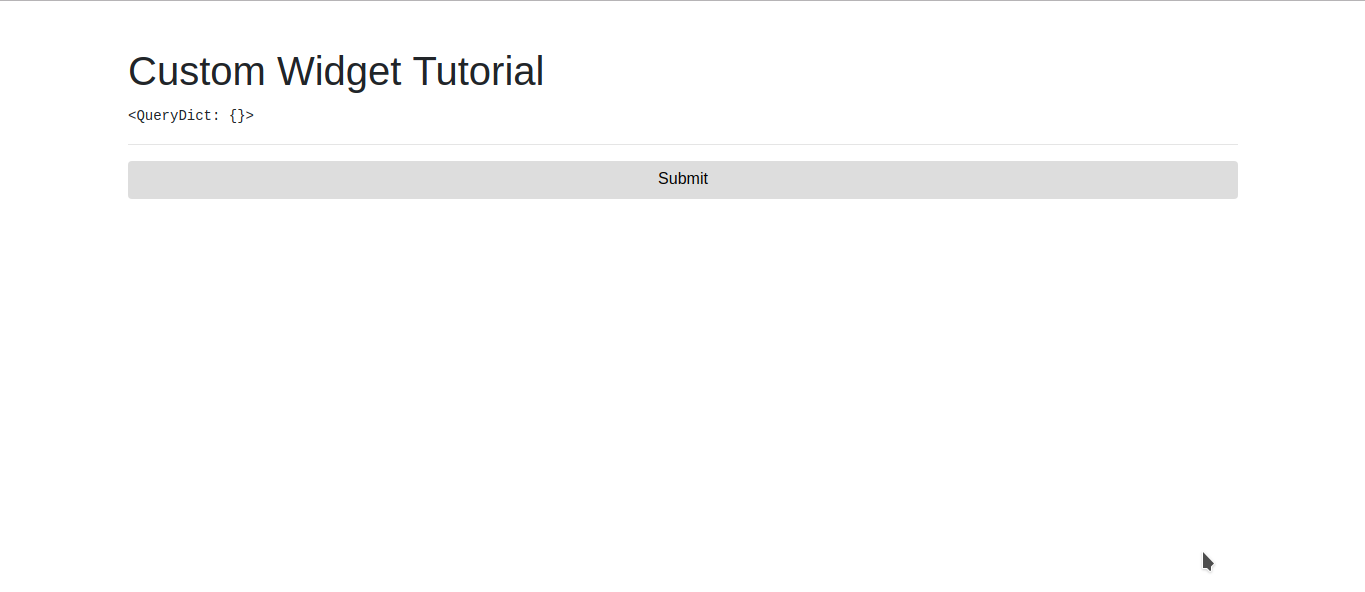
Open your browser, and see the page will look like
Next, we will make a new custom widget.
Toggle
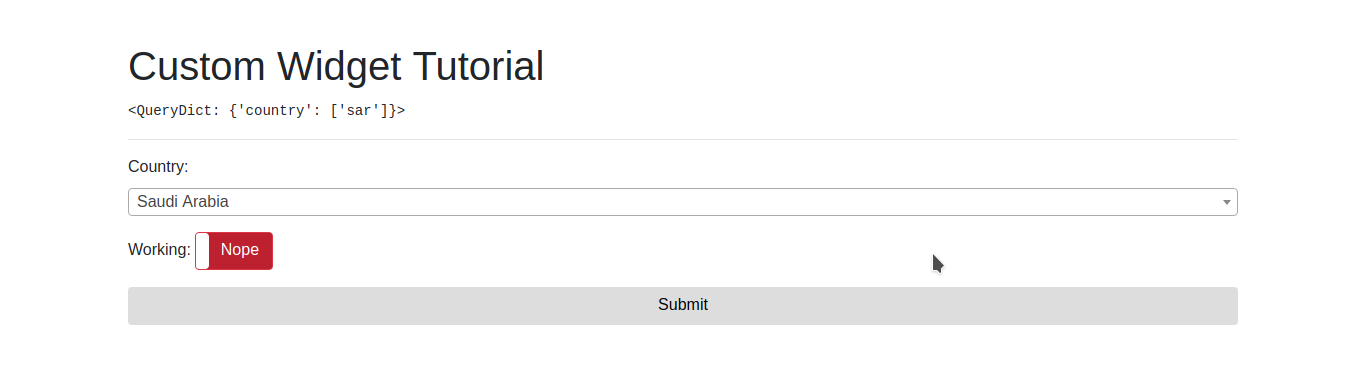
The idea is to create a toggle component, that uses checkbox as original input. Also, we will not create css / javascript from scratch. We will use this. Just because we use bootstrap as our base css.
Create custom_widget/custom_widget/widgets.py and write these lines.
from django import forms


class ToggleWidget(forms.widgets.CheckboxInput):
    class Media:
        css = {'all': (
            "https://gitcdn.github.io/bootstrap-toggle/2.2.2/css/bootstrap-toggle.min.css", )}
        js = ("https://gitcdn.github.io/bootstrap-toggle/2.2.2/js/bootstrap-toggle.min.js",)

    def __init__(self, attrs=None, *args, **kwargs):
        attrs = attrs or {}

        default_options = {
            'toggle': 'toggle',
            'offstyle': 'danger'
        }
        options = kwargs.get('options', {})
        default_options.update(options)
        for key, val in default_options.items():
            attrs['data-' + key] = val

        super().__init__(attrs)
class ToggleWidget(forms.widgets.CheckboxInput) we sublclass the forms.widgets.CheckboxInput. Then,
    class Media:
        css = {'all': (
            "https://gitcdn.github.io/bootstrap-toggle/2.2.2/css/bootstrap-toggle.min.css", )}
        js = ("https://gitcdn.github.io/bootstrap-toggle/2.2.2/js/bootstrap-toggle.min.js",)
this will append the custom media for the ToggleWidget. Will wrap css to link tags, and js to script tags every where we use the ToggleWidget widget. For further information, read the documentation.
Then, we will override the __init__ method, expect the options keyword arguments, add it as data-{option_key} tag attribute. Finally, we call the super method. The usage of this widget is like this.
Lets try our new widget in the django shell.
from custom_widget import widgets

tg = widgets.ToggleWidget()
print(tg.render(name='custom', value=''))
print(tg.media)

# with options
tg = widgets.ToggleWidget(options={'offstyle': 'default'})
print(tg.render(name='custom', value=''))
print(tg.media)
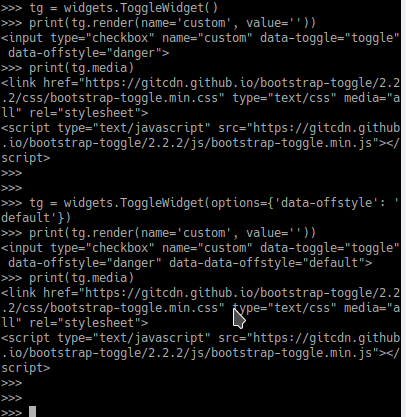
You will see, there is data-toggle and data-offstyle in the input tag. Also, tg.media is create link tag and script tag with the url we defined before.
Next, create the form. Create and edit custom_widget/custom_widget/forms.py
from django import forms
from . import widgets


class CustomWidgetForm(forms.Form):

    working = forms.BooleanField(
        # required must be false, otherwise you will get error when the toggle is off
        # at least in chrome
        required=False,
        widget=widgets.ToggleWidget(
            options={
                'on': 'Yep',
                'off': 'Nope'
            }
        )
    )
the options keyword argument is based on official bootstraptoggle site and don't prefix with data-.
Use this form, in the custom_widget/custom_widget/views.py and your file will looks like:
from django.shortcuts import render
from .forms import CustomWidgetForm


def home(request):
    if request.GET:
        form = CustomWidgetForm(request.GET)
    else:
        form = CustomWidgetForm()

    context = {
        'form': form
    }

    return render(
        request,
        'home.html',
        context
    )
and dont forget to add {{ form }} and {{ form.media }} in the index.html. And now, the index.html will be like
<!DOCTYPE html>
<html lang="en">
<head>
    <meta charset="UTF-8">
    <title></title>
<link href= rel="stylesheet">
<link rel="stylesheet" href="https://maxcdn.bootstrapcdn.com/bootstrap/4.0.0/css/bootstrap.min.css" integrity="sha384-Gn5384xqQ1aoWXA+058RXPxPg6fy4IWvTNh0E263XmFcJlSAwiGgFAW/dAiS6JXm" crossorigin="anonymous">
<link rel="stylesheet" href= />
<style>
.custom-select2-widget {
  width: 100%;
}
  .free-space {
    margin-top: 50px;
  }

  .toggle-handle {
    background: #fff;
  }
</style>
</head>
<body>

  <div class="container">
    <div class="free-space"></div>
    <h1>Custom Widget Tutorial</h1>


  <pre>{{ request.GET }}</pre>

  <hr>

    <form action="" method="get">
        {{ form.as_p }}

    <input type="submit" class='btn btn-block' value="Submit">
    </form>

  </div>

    <div class="free-space"></div>

<script
  src="https://code.jquery.com/jquery-3.3.1.min.js"
  integrity="sha256-FgpCb/KJQlLNfOu91ta32o/NMZxltwRo8QtmkMRdAu8="
  crossorigin="anonymous"></script>
<script src=></script>
<script src="https://cdnjs.cloudflare.com/ajax/libs/popper.js/1.12.9/umd/popper.min.js" integrity="sha384-ApNbgh9B+Y1QKtv3Rn7W3mgPxhU9K/ScQsAP7hUibX39j7fakFPskvXusvfa0b4Q" crossorigin="anonymous"></script>
<script src="https://maxcdn.bootstrapcdn.com/bootstrap/4.0.0/js/bootstrap.min.js" integrity="sha384-JZR6Spejh4U02d8jOt6vLEHfe/JQGiRRSQQxSfFWpi1MquVdAyjUar5+76PVCmYl" crossorigin="anonymous"></script>
<script src=></script>
{{ form.media }}
<script>
</script>
</body>

</html>
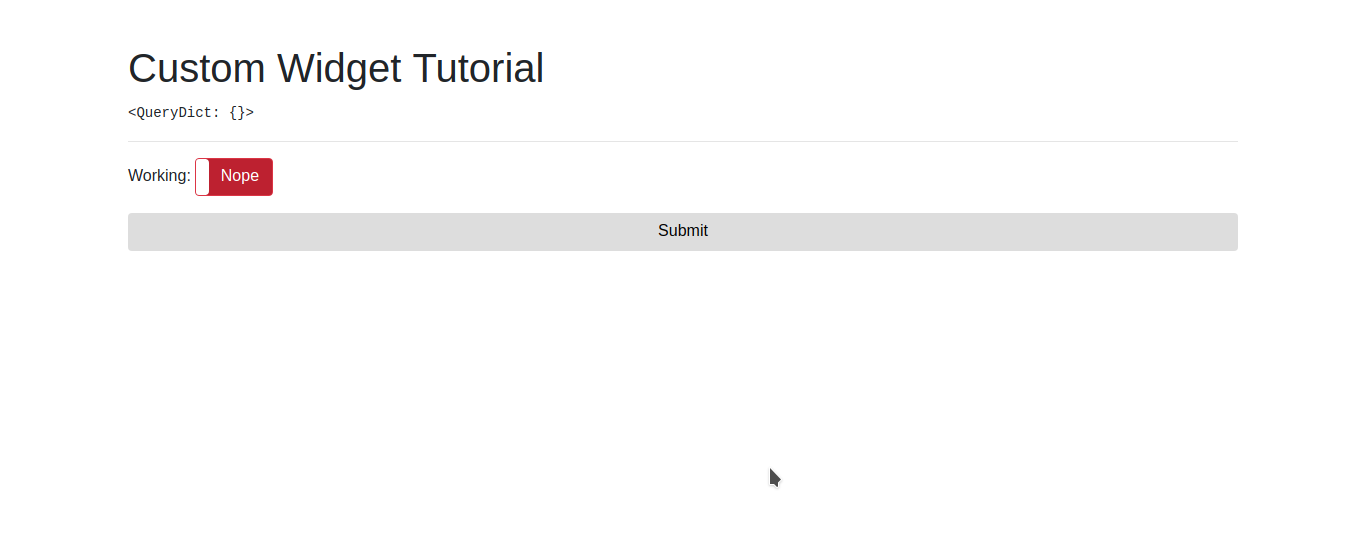
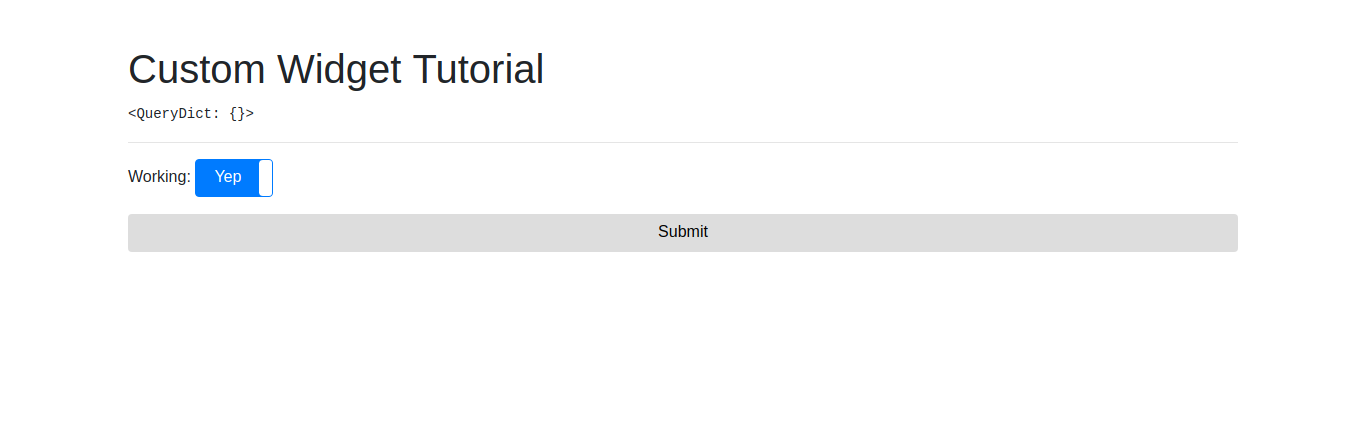
Finally, your page now like this
Select2
Next, We will use select2 for the next custom widget. Bassically, it's only the select tag but we will append data configuration to our custom widget attributes. And also, like before, we will append css and js media. And whenever we use this widget, django will check if that media urls found or not, if not it will appended into home.html file. Otherwise, the media urls not appended.
There is two different widget, first for multiple select, and second for single select. Thus, we will create separate class for these two. And these two share same Media and some method. So, here we will create a Mixin class.
in custom_widget/custom_widget/widgets.py add
class Select2Mixin():
    class Media:
        css = {
            'all': ("https://cdnjs.cloudflare.com/ajax/libs/select2/4.0.6-rc.0/css/select2.min.css",)
        }
        js = ("https://cdnjs.cloudflare.com/ajax/libs/select2/4.0.6-rc.0/js/select2.min.js",
              'customselect2.js')

    def update_attrs(self, options, attrs):
        attrs = self.fix_class(attrs)
        multiple = options.pop('multiple', False)
        attrs['data-adapt-container-css-class'] = 'true'

        if multiple:
            attrs['multiple'] = 'true'

        for key, val in options.items():
            attrs['data-{}'.format(key)] = val

        return attrs

    def fix_class(self, attrs):
        class_name = attrs.pop('class', '')
        if class_name:
            attrs['class'] = '{} {}'.format(
                class_name, 'custom-select2-widget')
        else:
            attrs['class'] = 'custom-select2-widget'

        return attrs
same as toggle widget, we specify class Media, but you can see a differences in js=..... If url is prefixes with http:// or https:// the django will leave it as is. Otherwise, like in the customselect2.js it will appended with STATIC_URL or MEDIA_URL configuration. documentation.
in update_attrs method, we will append options into attributes that rendered as tag attributes. And will prefixes with data-.
And fix_class method, we add custom-select2-widget class, and we will use it as select2 selector.
Create custom_widget/static/customselect2.js and fill it with
$(document).ready(() => {
  $('.custom-select2-widget').select2()
})
Its will initialize all select with class custom-select2-widget to be a select2 instance.
Now, lets create actual widget. Open custom_widget/custom_widget/widgets.py and write the following code
class Select2Widget(Select2Mixin, forms.widgets.Select):
    def __init__(self, attrs=None, choices=(), *args, **kwargs):

        attrs = attrs or {}
        options = kwargs.pop('options', {})
        new_attrs = self.update_attrs(options, attrs)

        super().__init__(new_attrs)
        self.choices = list(choices)
Note, the options is the select2 options. Nothing special.
Then, open custom_widget/custom_widget/forms.py and add following code in the CustomWidgetForm class.
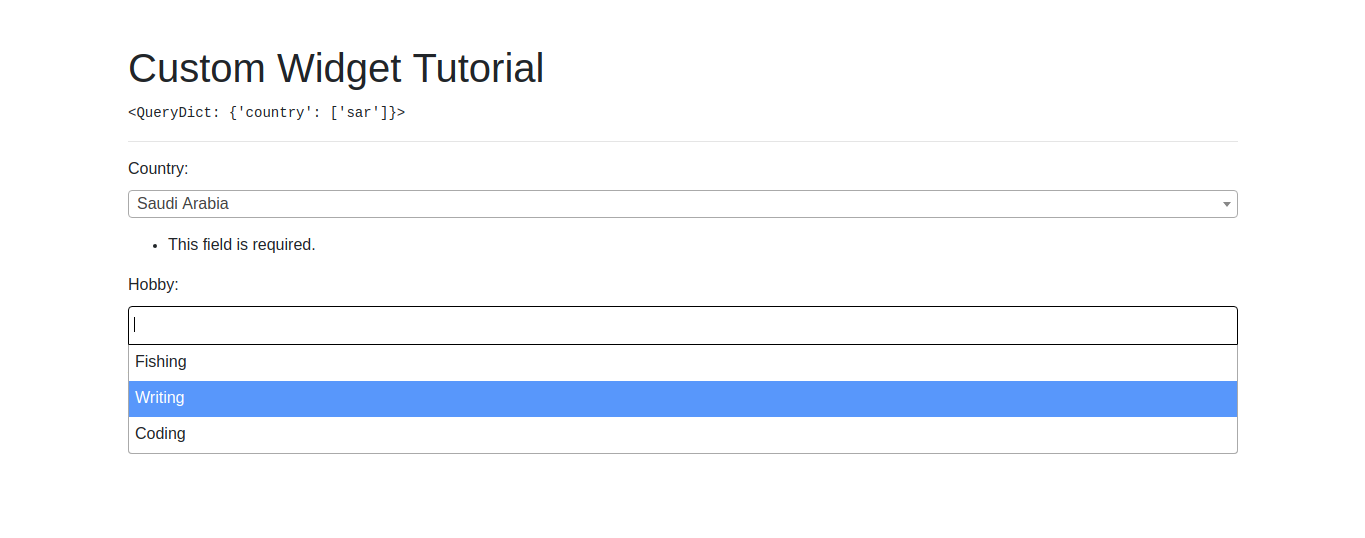
    country = forms.ChoiceField(
        choices=countries,
        widget=widgets.Select2Widget
    )
and the countries variable is like
countries = [
    ('id', 'Indonesia'),
    ('sar', 'Saudi Arabia'),
    ('usa', 'United Stated')
]
Reload your page and your page should like this
Let's do for MultipleSelect. In widgets.py:
class Select2MultipleWidget(Select2Mixin, forms.widgets.SelectMultiple):
    def __init__(self, attrs=None, choices=(), *args, **kwargs):

        attrs = attrs or {}
        options = kwargs.pop('options', {})
        new_attrs = self.update_attrs(options, attrs)

        super().__init__(new_attrs)
        self.choices = list(choices)
Same with Select2Widget, except now we subclass the SelectMultiple widget.
and in the forms.py at CustomWidgetForm class add hobby attribute:
    # make sure to use multipleCHoiceFIeld if you want to use multiple selection
    # otherwise, you will get an error
    hobby = forms.MultipleChoiceField(
        choices=hobbies,
        widget=widgets.Select2MultipleWidget(
            options={
                'placeholder':'Your placeholder',
                'multiple':True,
                'maximum-selection-length': 1
            }
        )
    )
and for hobbies variable fill with:
hobbies = [
    ('fishing', 'Fishing'),
    ('writing', 'Writing'),
    ('coding', 'Coding')
]
Save, and reload your browser. You will get a page like this
But, if you got a page like following, the customselect2.js asset not loaded properly.
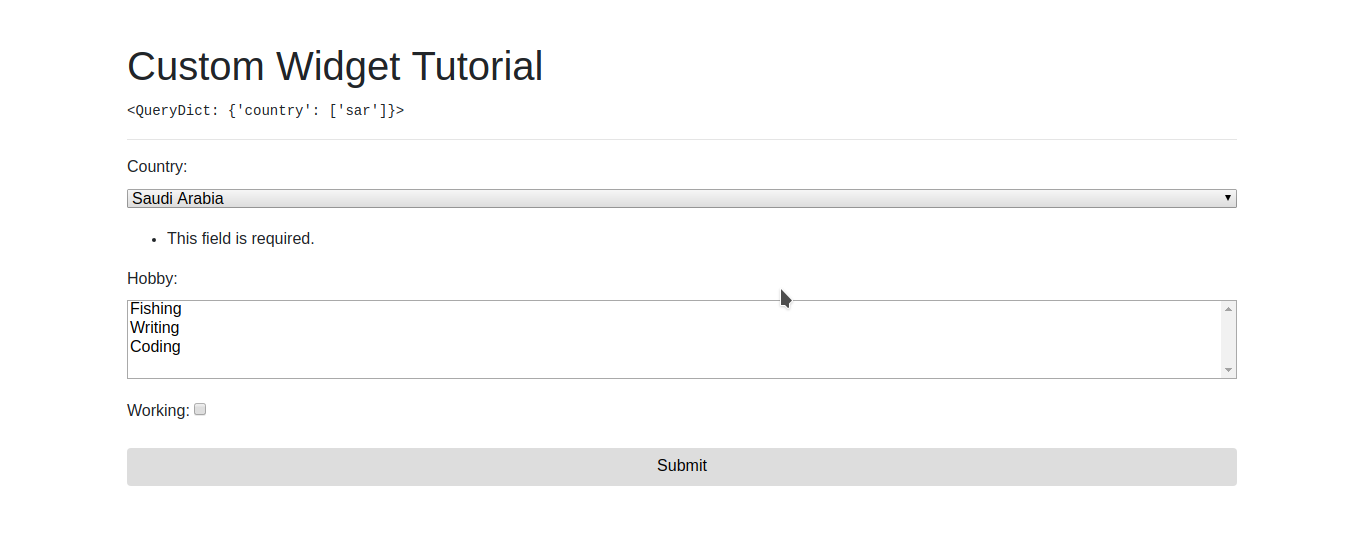
To fix this, go to custom_widget/custom_widget/settings.py and add this snippet
STATICFILES_DIRS = [
    os.path.join(BASE_DIR, 'static')
]
This will tell the django when you visit host/static/customselect2.js to find it from static folder. Save and reload, your problem will be fixed.
DropZone
This is the last example that I will cover in this article. In this example, I will introduce the template overriding. Ya, thats mean, you will be able to override the django template for each field.
And here is the difference between Django >= 1.11 and 1.8. In the django 1.8 you have to override the render method for each widget while the >= 1.11 version not. Just create a template, and pass it as template_name class variable.
There is another differences for django 2.1 and before it, thats the json_script template tag. While the <= 2.1 version didn't has the json_script, we still can store the json data as global variable. Thats what I will do here.
Enough for talking, lets jump into coding :
Edit the custom_widget/custom_widget/widgets.py file, and add following code for Django >= 1.11
class DropzoneWidget(forms.widgets.FileInput):
    template_name = 'forms/widgets/dropzone.html'

    class Media:
        js = ("https://rawgit.com/enyo/dropzone/master/dist/dropzone.js", 'customdz.js')
        css = {
            'all': ("https://rawgit.com/enyo/dropzone/master/dist/dropzone.css",)
        }

    def __init__(self, attrs=None, options={}):
        self.options = options

        super().__init__(attrs)

    def get_context(self, name, value, attrs):
        current_class = attrs.get('class')
        custom_class = 'custom-dropzone-widget-' + name

        if current_class:
            attrs['class'] = current_class + ' ' + custom_class
        else:
            attrs['class'] = custom_class
        context = super(DropzoneWidget, self).get_context(name, value, attrs)

        self.options.update({
            'class': custom_class,
            'paramName': name
        })

        context['options'] = self.options
        return context
Bassically, the Dropzone widget is the FileInput widget but We will override the template and wrap it with dropzone structure.
Also, we will add some options and will pass it into template. The options is dropzone options. And we add a custom class for the dropzone widget, to make a css selection when initializing widget.
Lets talk about template! Create a new file at custom_widget/templates/forms/widgets/dropzone.html and add the following code
<div class='{{widget.attrs.class}} dropzone'>
  <div class="fallback">
    <input id="{{ widget.attrs.id }}" type="file" name="{{ widget.name }}">
  </div>
</div>

{{ options|json_script:widget.attrs.class}}
All required attribute is at widget.attrs object. The .fallback class will be hidden if dropzone successfully initialized. Otherwise, this that will be show to you.
{{ options|json_script:widget.attrs.class }} section will create script tag with widget.attrs.class id, and options converted to JSON object as innerHTML.
Then, create a new file at custom_widget/static/customdz.js and fill with
  Dropzone.autoDiscover = false;
  $(document).ready(() => {
    $('[id^="custom-dropzone-widget"]').each((index, element) => {
      options = JSON.parse($(element).text())
        className = 'div.' + options.class
      console.log(options)
      new Dropzone(className, options)
    })
  })
Don't forget to set autoDiscover to false. Then select all ids that prepended with custom-dropzone-widget. This will select all dropzone options. Parse the text as JSON object. Get the dropzone class, and initialize the dropzone widget. Thats the secret!
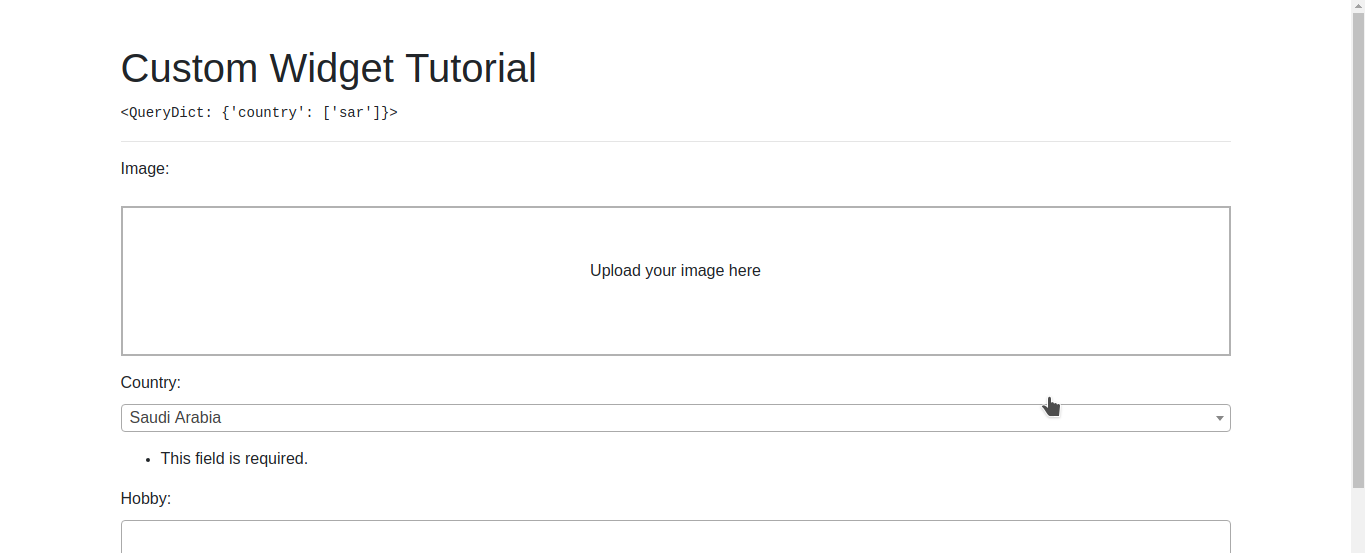
Lastly, edit the CustomWidgetForm and add the following class variable :
    image = forms.FileField(
        widget=widgets.DropzoneWidget(
            options={
                'url': '/hello', # not exists yet :D
                'addRemoveLinks': True,
                'dictDefaultMessage': 'Upload your image here'
            },
        ),
        required=False
    )
save and reload. Your page should be like
Hmmt, maybe you will get an TemplateDoesNotExists exception. Thats because I forget to notice you to adjust your settings.py file.
first, add
FORM_RENDERER = 'django.forms.renderers.TemplatesSetting'
and add django.forms to INSTALLED_APPS
save and reload, your problem is not persist.
How about Django 1.8 ? Lets handle it.
Edit the widgets.py file (I think you have remembered where this file stored :)).
import json

from django import forms
from django.template.loader import render_to_string
from django.utils.safestring import mark_safe

class DropzoneWidget(forms.widgets.FileInput):
    template_name = 'forms/widgets/dropzone.html'

    class Media:
        js = ("https://rawgit.com/enyo/dropzone/master/dist/dropzone.js", 'customdz.js')
        css = {
            'all': ("https://rawgit.com/enyo/dropzone/master/dist/dropzone.css",)
        }

    def __init__(self, attrs=None, options={}):
        self.options = options

        super().__init__(attrs)

    def get_context(self, name, value, attrs):
        context = {}
        current_class = attrs.get('class')
        custom_class = 'custom-dropzone-widget-' + name

        if current_class:
            attrs['class'] = current_class + ' ' + custom_class
        else:
            attrs['class'] = custom_class

        attrs = self.build_attrs(attrs, name=name)
        self.options.update({
            'class': custom_class,
            'paramName': name
        })

        context['widget'] = {
            'name': name,
            'attrs': self.build_attrs(extra_attrs=attrs),
        }

        context['options'] = json.dumps(self.options)
        return context

    def render(self, name, value, attrs={}):
        context = self.get_context(name, value, attrs)
        return mark_safe(render_to_string(self.template_name,
                                          context))
Can you catch the differences? The important thing is to override the render method yourself. Another thing is to pass a context that required in the template, so I not have to make a lot changes.
Then, the forms/widgets/dropzone.html file
<div class='{{widget.attrs.class}} dropzone'>
  <div class="fallback">
    <input id="{{ widget.attrs.id }}" type="file" name="{{ widget.name }}">
  </div>
</div>

<script id={{widget.attrs.class}}>
  window['{{ widget.attrs.class }}'] = {{ options | safe }}
</script>
Here is the trick. Pass the options as global variable. With key == widget.attrs.class.
In the static/customdz.js
  Dropzone.autoDiscover = false;
  $(document).ready(() => {
    $('[id^="custom-dropzone-widget"]').each((index, element) => {
      options = window[element.id]
      className = 'div.' + options.class
      new Dropzone(className, options)
    })
  })
select all tag with id prepended with custom-dropzone-widget. For each element, we will have an id. Then, we can get the options by selecting with window[theElementId]. Finally, we initialize the element to be a dropzone instance.
The last thing you should do is to adjust forms.py file like above. Save and reload your page for server that serve Django 1.8. And if you notice, you not need to change anything in the settings.py file.
Conclusion
Finally, 3 examples was done. I hope you can understand and create a new - if needed - custom django widget for your very custom application.
And here is some tips for creating a new custom django widget:
- Deep dive into django widgets documentations.
- You also can go into django admin widgets source code. Learn the widget customization from there.
- When you need to override the template, make sure to add
django.formsto theINSTALLED_APPlist. And addFORM_RENDERER = 'django.forms.renderers.TemplatesSetting'for django >= 1.11 - For django 1.8, to override the template, you need to override
rendermethod. - Add the asset required as
Mediaclass in the widget subclass. This will add the assets if not found in the template whenever widget used. - To make the
Mediaclass actually works, add{{ form.media }}in your template. If not, your media assets not loaded.
Thanks for reading, I hope you have a nice adventure with this examples.
